Fanart.tv Browser Enhancements

Imagus – Enlarge thumbnails, and show images/videos from links with a mouse hover.
ImagusMOD – A custom modification to Imagus that allows for Cycling through background colors.
Stylish – Easily install themes and skins for many popular sites.
Description:
This guide will go over some of the ways you can improve your browsing experience on Fanart.tv. This is ever changing due to site and software updates, but I will try to keep it as current as possible. The site works perfectly fine without these additions and may not be an improvement for some, but other may find these addons will greatly improve the enjoyment of the site. Some of these addons were designed for the moderators to help improve our ability to moderate artwork more efficiently, but there is no reason that our contributors can’t benefit from them as well.
Prerequisites:
Some of these addons will require some basic knowledge of using a text editor. I will try to make the procedures as beginner friendly as possible so you should be able to follow along with a little diligence. I will also just be covering installation on the Chrome and Firefox browsers. These may work fine on other browsers, but you will have to work out the details on your own.
Imagus
Description:
Imagus is an in browser image viewer that allows you to hover over a thumbnail to see an image full size. It also has extended features that allows for zooming, panning, rotating, and showing image information such as dimensions. All while staying on the original page. The amount of features is impressive, but I will only cover the basics here. The program used to be hosted on Opera’s blog site, but since it was shut down. he has set up a temporary homepage here. Imagus
Installation:
- In Chrome/Chromium, install like any other extension from the Chrome Web Store.
- In Firefox, go here and click on the Firefox icon. (Make sure to allow the addon and you will be all set.)
Setup:
The extension works “out of the box”, but you may find that some small tweaks will greatly improve it’s usefulness.
- In Chrome/Chromium, go to the Extensions Page and locate Imagus. Click the Options link.
- In Firefox, go to the Addons Page and locate Imagus. Click the Preferences link. (or you can try this link to go there directly.)

Once you have your setting page up, you can try these settings as a starting point.
(Don’t forget to turn on the Advanced Options.)
Here is the Custom style (CSS)
margin: 6px 2px 22px; background: transparent; background-clip: padding-box; border: none; box-shadow: 0 0 3px #222; padding:10px; border-radius: 6px;
The biggest difference you will notice from the default settings is that you need to use a modifier key to have Imagus show the full image. Without this, anytime you are using your mouse on a webpage, you run the risk of having images popping up everywhere. I use the “SHIFT” key as my modifier and recommend you do the same.
Usage:
Once everything is installed and setup, you will now notice a red dashed outline around any image that Imagus can open to full size. (This might now show on all sites.)
Now once you mouse is over the image, just press the SHIFT key to show the image at full size. It should display the image as large as it can while displaying the entire image. From here you have some options. If you press the “z” key, it will display the image at 100% original size. If the image is now bigger than your view-port, you just need to move your mouse towards the edge you want to see. Imagus will automatically pan the image to wherever you move your mouse.
Using the “SHIFT+c” combination will display the image dimensions in the upper left corner. You can check out all of the available shortcuts by clicking the Shortcuts link in the extension’s options.
There is a lot to explore and you can play around with the settings as you like. If you copied my settings, you will notice that the border of the full image is transparent. This is to allow for the next addon I will talk about , which is a modification to the existing Imagus code. If you decide not to install it, you may want to set the border color to something other than transparent.
ImagusMOD
Description:
ImagusMOD is a user_javascript written by @Paszt to allow moderators to cycle though different colored backgrounds while using the Imagus Extension. It will also show a red 10px border that denotes the gutter required for HDLogos. Both features are accessed via shortcut keys.
This makes moderating images exponentially faster and allows us to inspect images right in the browser instead of having to drag/copy/save every image into our image editor of choice to moderate. The benefit for contributors is that you will be able to see the same things we do when moderating you images and will be able to catch more mistakes. I not only use this to moderate, but when I upload an image to the site, I will click on the uploaded image link and inspect it right there as if I was moderating it. I have caught many mistakes that way and was able to immediately go to the dashboard to delete the image so I could fix it and re-upload. Used properly, this should all but eliminate denials for small overlooked problems.
Installation:
Installation is a bit trickier since this is a custom addon. Follow along closely and you should be ok.
Chrome/Chromium
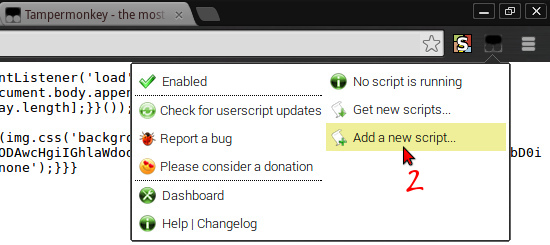
1. Install an extension called TamperMonkey that allows you to install user_javascript files. (Once installed you will presented with an overload of information about this extension. Feel free to read through it now or later.)
2. Click on the TamperMonkey extension icon on your toolbar and select “Add a new script…”
3. You now have a window that has some defaults set for a generic user_javascript. Select all the default text and delete it.
4. Download the ImagusMod here.
5. Unzip the file and drag it into the TamperMonkey window.
6. Click on the Save icon. Done!

Firefox
1. Install an addon called GreaseMonkey that allows you to install user_javascript files.
2. Download the ImagusMod here.
3. Unzip the file and drag it to your browser.
4. Accept and DONE!
Usage:
This is pretty simple to use as there are only 2 functions.
CTRL+ALT+q = Cycles through Black, White, Red, Green, and Transparent Backgrounds.
CTRL+ALT+w = Toggles a 10px red gutter for checking HDLogos.
(This is only useful on logos and only at 100%. Trying to zoom in or out with this toggled on will make the gutter repeat and it won’t be of any use.)
Stylish
Description:
Stylish is a browser addon for both Chrome and Firefox that allows for custom CSS styles to change the look of a website. We have had a few people including myself that have written custom CSS to give the site a darker theme, and you can use these by installing the Stylish Addon/Extension.
Options:
We have styles for both the main site and the forums.
Main Site
Forums
- Chrome/Chromium Dark Forums Style
- Chrome/Chromium Dark Forums Style – Small Smilies
- Chrome/Chromium Dark Forums Style – Large Smilies
- Firefox Dark Forums Style
- Firefox Dark Forums Style – Small Smilies
- Firefox Dark Forums Style – Large Smilies
Installation for Main Site Style:
Chrome/Chromium
1. Install extension through the Chrome Web Store
2. Download the Main Site style for Chrome
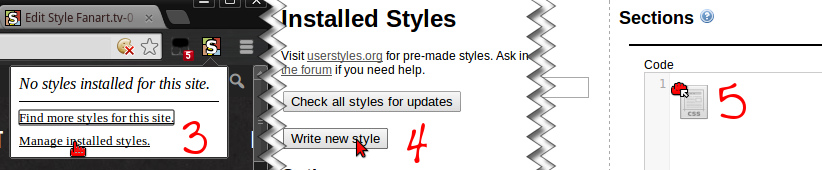
3. Click the Stylish icon on the toolbar and go to “Manage Installed Styles“.
4. Click “Write new style”
5. Drag the style file into the code window.
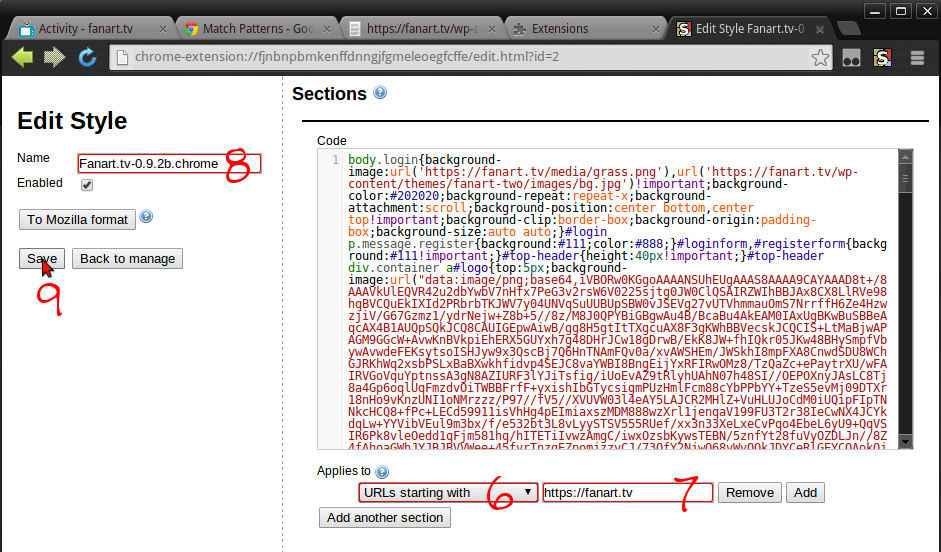
6. Click the “Specify” button below the Code window.
You will then be presented with a drop-down selection box.
Select “URLs starting with“.
7. Enter the following text into the box.https://fanart.tv
8. Name the Style.(Anything is fine. I used the filename.)
9. Save the new Style.
Firefox
1. Install Stylish through internal Addon Search or from here.
2. Click the Stylish icon on the toolbar and go to Write new Style >> Blank Style.
3. Name the Style. (Anything is fine. I used the filename.)
4. Drag the style file into the code window.
5. Save the new Style.

Usage:
In both browsers you are able to use the Stylish icon on the toolbar to enable, or disable the style at will. This is handy in the case where there is a bug in the style, or site changes have been made and the style hasn’t been updated yet.
Installation for Dark Forum Style:
Installation for the forums follows the same procedures outlined above.
The only difference is with the Chrome/Chromium install. You must alter the code for step 7 to reflect the Forum’s URL address with the following.
https://forum.fanart.tv/
Usage:
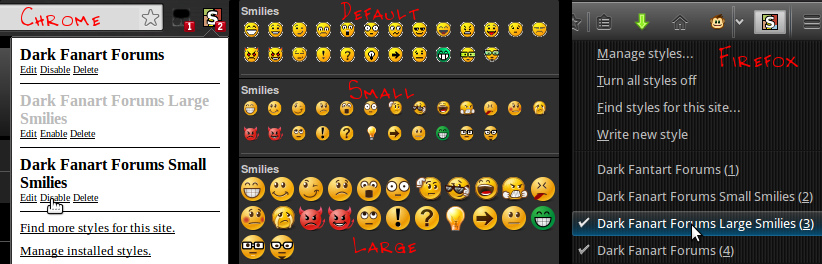
The Forums styles come with an option for small or large smilies. The default smilies were designed for a light theme and have a white outline that is not very pleasant to look at against a dark background. You should choose and install at least one of the Smiley options to go along with the dark theme. You can install both if you like and just enable/disable the combination you want in the Stylish toolbar menu.
Summary:
Hopefully it wasn’t too difficult to install and setup the enhancements you were interested in. There is a good chance that as the site makes changes and/or the Extensions and Addons get updated, you may find that it can break functionality. We will do out best to keep this up to date, but we sure could use you help. When you notice something that changed or breaks, please post about it in the forums.
Comments are closed.