Scanning cover art – better source images for better covers

Are you struggling to fix scans you found on the net? Why bother touching up source images of questionable quality when you could easily create better ones? As a music or movie enthusiast you probably have the actual physical covers those scans are based on in your media collection. Scanning cover art yourself will save you a lot of headaches and time and will ultimately give you better results.
Here are a couple of things you should consider before and after hitting the “scan” button:
1. Clean your scan bed
What you clean off your scanner, you won’t have to clean using your image editing software. Remove dust with a dry, lint free cloth. Smudges can be removed with a cloth that is dampened with glass cleaner.
Also make sure there is no dirt or dust on the cover art you’re scanning.

Dust on a scan
2. Stay away from the edges
Your scanner may not scan all the way to the edge of the scan bed. To capture as much of the cover as possible, stay away from the edges.
Your image may end up a bit skewed, but that’s no big deal. The edges of your cover are probably not perfectly parallel to the text or other horizontal elements printed on it, so you’ll have to rotate it a bit in your graphics application in any case. (In Photoshop, find a straight line with the ruler tool and then apply Image->Image Rotation->Arbitrary)
3. Translucent paper
Many CD booklets use a very thin paper and the print on page two is showing through the cover. Try placing a black piece of construction paper behind it to keep this from happening.

Page 2 of the CD booklet shining through
4. Weigh it down
Your scanner’s lid is supposed to keep the scanned object flat, but it’s not all that heavy. Try holding your cover down with a heavy book to make it lay really flat on the scan bed for best results. This is particularly important if your scanner uses a contact image sensor, as these only have a very limited depth of field.
5. Resolution
Keep in mind you are working with printed images. You can scan at incredible resolutions, but in the end the resolution of the print screen is what really limits the quality you can get out of a scan. To capture the screen pattern without any additional moire, you need to scan at at least three times the resolution of the print screen. 600dpi will be sufficient in most cases. With 1200 you’re definitely on the safe side.
6. Size
Always scan at 100%
7. Bit depth
8 bit per channel should be enough for your final image, but consider scanning or working with 16 bits per channel and only converting to 8 bit after levels are set and color adjustments are done. This can avoid gaps in your histogram.
8. Sharpening
Scanning software often has a sharpening option activated by default. Deactivate it. It will bring out flaws and the print screen – making it harder to descreen later on.
Better apply any sharpening (if you need any) after descreening and cleaning up.
But watch out for sharpening artifacts! You don’t want to overdo it.
9. Auto-adjustments
Auto-exposure, Auto-levels or auto colors may all introduce clipping or mess with the colors of your image. Turn them off for a better and more accurate scan.
10. Levels
If you set black and white points in your graphics application rather than your scan software, you may end up with gaps in your histogram. Set them in your scan software and your histogram should be smooth.

Gaps in a histogram with clipped shadows and highlights
But be careful! If the histogram in your scan software is not accurate, you may accidentally clip shadows and highlights. In that case you’re better off dealing with it in your graphics application after all, where you may have better control over clipping (if you’re using Gimp, try the logarithmic view of the histogram; if you’re using Photoshop, hold the ALT key while adjusting the shadows and highlights sliders for a clipped pixel view).
11. Descreening
You may want to try your scanner’s descreening option, but even if it works well it may make the scan blurrier than it needs to be.
You might as well use a similar technique in your graphics application by adding median noise, gaussian blur or a despeckle filter to your image and then shrinking it down to the desired size using a smooth resizing algorithm.
Far better results can be achieved using any Fourier transformation based method. That means either using a Fourier plugin (like FFT or G’MIC’s Fourier filter in GIMP) and manually manipulating the transformed image or using an automated form of it, like the descreen script for GIMP or Sattva’s descreen plugin for Photoshop.
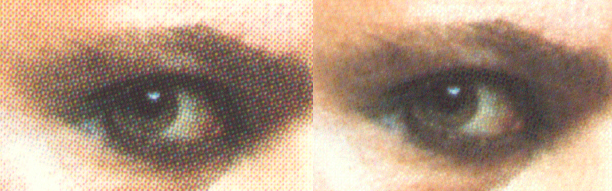
left: before fourier descreening; right: after
This video will show you how to manually descreen:
Note that some form of descreening is an absolute necessity. Without descreening you will end up with moire patterns in your images (and they are very unlikely to get accepted here).
12. Denoising and smoothing
After the Fourier descreening you may feel the need to denoise your image a bit. Some scans can also use a bit of smoothing. Try the Neat Image plugin if you’re a photoshop user or wavelet denoise and G’MIC’s bilateral smoothing if you’re a GIMP user. But be careful! These tools can easily be overused and you don’t want to lose image detail.
13. Color Profile
You’re preparing an image that is going to be displayed on monitors and used on the internet. sRGB should be your target color profile.
14. Scanning software
Third party software may give you better control over your scanned image compared to what the manufacturer of your scanner is providing. VueScan and Silverfast are the most popular alternatives. I suggest you check them out.
15. If you’re scanning 12” vinyl record covers…
scanning will be a bit tricky, but they’re well worth the effort.
Oversized scanners that can scan vinyl record sleeves in one pass are expensive, but don’t worry, you don’t need to buy one. An affordable CCD scanner will do the job just fine. You just need need to scan in four sections.
As some scanners may distort the output a little along the long axis, rotating the cover between scans may result in sections that don’t fit together perfectly. Better just shift the cover around on the scanner.
Also make sure that auto adjustments are off or the same for all scans, so that colors and exposure will match when you stitch them together.
To make stitching easier, weighing down the cover is particularly important. The parts of the cover that were not lying flat on the scan bed should be cropped off before stitching.
For stitching I can highly recommend Hugin. It may not be the easiest to use stitching tool around, but it’s free and does an really excellent job. Make sure you follow this tutorial: http://hugin.sourceforge.net/tutorials/scans/en.shtml
That’s it! I hope this tutorial helped you improve the quality of your cover art. Being aware of all this sure helped me create better source images than what is usually available online.
Comments are closed.