
| << Previous: Operating System | << Contents >> | Next: Software>> |
Set up your NAS Server
Setup your network configuration
Since you are running a server I guess you don’t want to run it in dhcp mode.
$ sudo vi /etc/network/interfaces
sudo will run your command with root (administrator) privileges – you have to enter your password to do this. Further information for the sudo command.
Your output should look like this
# This file describes the network interfaces available on your system # and how to activate them. For more information, see interfaces(5). # The loopback network interface auto lo iface lo inet loopback # The primary network interface auto eth0 iface eth0 inet dhcp
It is possible that your network card is not called eth0. In this case do not change the name of the network card in the following update of your config. Just replace eth0 with the actual naming of our ethernet card.
To get an static ip you need to edit it to the following but consider to change the settings to your current network configuration. Move your cursor to the lines you want to remove and press dd (two times d) to remove a line. Press d3d to remove the next 3 lines. To insert text hit i.
# This file describes the network interfaces available on your system # and how to activate them. For more information, see interfaces(5). # The loopback network interface auto lo iface lo inet loopback # The primary network interface auto eth0 iface eth0 inet static address 192.168.178.10 netmask 255.255.255.0 network 192.168.178.0 broadcast 192.168.178.255 gateway 192.168.178.20
When you inserted your new network config hit Escape and type :wq to save (w) and leave(q) VIM. You can find more information for VIM here.
Now we have to remove all lines from /etc/resolv.conf
$ sudo vi /etc/resolv.conf
Move your cursor to the top and press d9d to remove the next 9 lines (that should cover all lines) or hit i and comment all lines with an #.
When you saved the file we just need to restart the network service, to do that type the following in your terminal:
$ sudo service networking restart
(Tip: type sudo service net and press tab – it should automatically complete the word networking. You can almost tab anything in ubuntu)
To check if you get your desired static IP we will use ifconfig
$ ifconfig
The second line of your output should similar to this
inet Adresse:192.168.178.10 Bcast:192.168.178.255 Mask:255.255.255.0
If your IP address is displayed correctly then it works.
In the next part we will install SSH to configure and administrate our server from a remote computer.
Install SSH to administrate your server from a remote desktop
Secure Shell is a secure network protocol for a remote command-line login – you will need it to administrate your server from a remote computer. To enable SSH on our server we have to install the openssh-server package with apt-get. It is a part of the advanced packaging tool that allows you to install deb packages. You will often find apt-get or a similar packaging tool like Aptitude in your daily Linux administration.
$ sudo apt-get install openssh-server
The installation of openssh-server will probably ask you to install some dependencies – just answer the question with y or yes.
How to connect to your SSH Server
Linux and Windows users can use PuTTY – a classic lightweight tool to use the SSH protocol. Download PuTTY and run it. If you are running Linux I recommend to connect to SSH directly from the terminal what is pretty simple as you can see.
$ ssh user@ip
You will be asked for your credentials and well basically that’s it.
To set PuTTY up you just have to enter the IP of your server into the host name field. If you want to save your connection give a name in the field under “Saved Sessions” and hit save on the right.
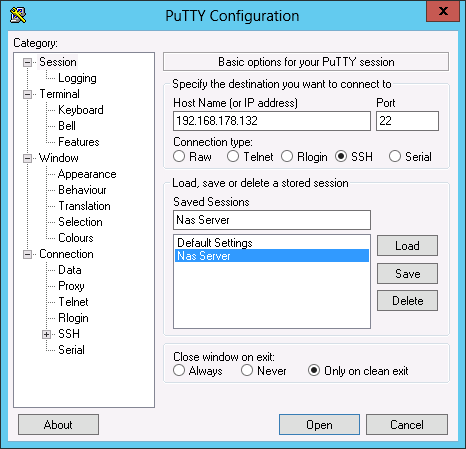
When you want to connect to your server click open and accept the following popup. This message will only appear once when you accept it.
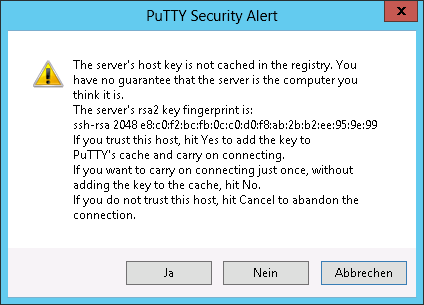
Now you are connected to your Server – as would you sit in front of it.

Get a Key-Pair for ‘secure’ non pw connecting
To make the connection to the server more comfortable you could use public key authentication. For our purposes it would allow you (only you) to connect to the server without a password. The server and you basically will own a file that tells the server “okay let that guy in”. You own the private key and the server owns the public key. Someone without the private key can’t connect to the Server without password.
We will also take a look how to denied any connections without a private key – so you can’t log into your sever without a private key anymore.
To generate your key pair you have to SSH into your server. Type into the terminal:
$ ssh-keygen Enter file in which to save the key: Keep blank to use the default Enter passphrase: Keep blank [Enter] Enter same passphrase again: Keep blank again of course [Enter]
Now you have generated your key pair, move to the path where they are stored. Unless you did not changed default path type the following into the terminal to get in the default folder. The cd command will help you to move around your file system and set your current working directory. (Tip: cd .. will move to the parent directory) To make sure the keys are generated we will take a look at the files that are currently deployed in your output directory. To get all visible files of a directory just type in ls. To see hidden and visible files you can use the -a parameter. When you want to list the output instead of having it side by side you can use the -l parameter. (Tip: you can combine parameters, so you could use ls -al)
$ cd ~/.ssh/ $ ls -l
Your output should look similar to this
-rw——- 1 lsc lsc 1675 Jan 15 00:40 id_rsa
-rw-r–r– 1 lsc lsc 392 Jan 15 00:40 id_rsa.pub
The last step is let SSH know that we want to let connections in with our new key. When the file authorized_keys do not already exist you can just rename id_rsa.pub to allow this key. The command mv makes you able the move files around the systems, actually renaming a file is moving it. So move it from id_rsa.pub to authorized_keys.
$ mv id_rsa.pub authorized_keys
When the file authorized_keys already exists you have to append the content of id_rsa.pub to your authorized keys with cat. cat is a command that send the content of a file to the standard output in Linux. You can redirect the output with > or >>. First will overwrite the content of an existing file while >> will append to an existing file.
$ cat id_rsa.pub >> authorized_keys
In the last step we set the user permissions of our authorized keys to rw – read and writable for the current user. You can find a brief explanation about the linux user permissions system here. When you are not familiar with the permission system I highly recommend to give it a read. The chmod command will set the user permissions to files and folders.
$ chmod 600 authorized_keys
When you have your key pair we need to get the private key id_rsa on our local machine. There are many ways to accomplish that – when you use Linux as your desktop computer you easily can use rsync. Replace user in the following statement with you username on the server and replace localuser with the username on your desktop computer. Now run it from your desktop computer. Also consider that you change the IP to you servers one.
$ rsync [email protected]:/home/user/.ssh/id_rsa /home/localuser/.ssh/ida_rsa_nas
When the directory .ssh was not found on your local system, create it and try to rsync our private key again.
$ mkdir ~/.ssh
Now you have to add the private key to your ssh setup on your local machine
$ ssh-add ~/.ssh/id_rsa
When you are running windows you can use WinSCP to connect SFTP and download the desired file from your server. It is the same process as downloading a file over the FTP protocol. First you need to download WinSCP – you can use the portable version to avoid installing it.
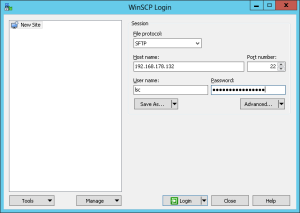
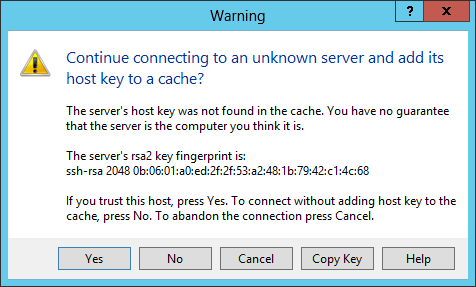
When you stared WinSCP select SFTP as protocol, fill in your credentials and click Login. Since we are connecting to a local server you can accept the following warning without any worries – basically this will tell us just that you never connected to this server.
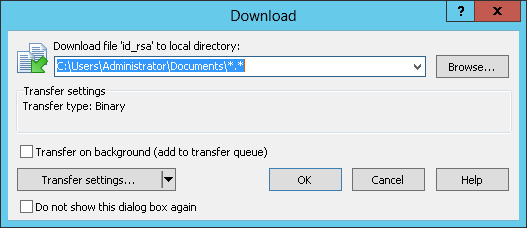
Fine now you should be connected to your server. You start in the home directory of your user, so you just have to move into the .ssh folder. Now select the file id_rsa and click Download or press F5 this will prompt you the select a folder where you want to store the selected file. Save it anywhere you want but consider you will need this file to connect to your server. So keep it in a space where you won’t delete it accidentally.
The next step is to produce a key in putty format from the openssh key. We need to download PuTTYgen from putty.org. Start PuTTYgen and click conversions -> Import Key. Select your downloaded private key and click on save private key. In the next step we need the newly created file, so remember where you saved it.

Now start PuTTY, we have installed it earlier. Select the connection we created and click on Load. On the left site navigate to connection -> SSH -> auth and browser for your private key.

Now go back to session and press save. Now you should be able to connect to your server again.
Set up a shortcut to connect easily to your server
Under Linux you can easily create a so called alias that just replaces a command with your alias. So you can set an alias like nas to connect to your nas server via SSH, just replace user and ip. Type the following into your remote computers terminal (Tip: usually you can open a terminal with CTRL + ALT + T)
alias nas=”ssh user@ip”
When you now type nas into your terminal the actual command ssh user@ip will be executed. When you close the terminal this alias will be gone – to have it in every terminal session just edit the file ~/.bashrc and set the command from above at the end of the file.
In windows you can create a shortcut to your putty.exe. Right click the shortcut and press options. Add the following to the target but consider to replace Nas Server with the PuTTY profile you want to load.
-load “Nas Server”
So it should look similiar to this
C:\Users\LSC\Documents\ssh\putty.exe -load “Nas Server”
Now you are able to connect directly to your server with your shortcut. When you want to enable auto-login load your profile in PuTTY and set your IP address to user@ip. Don’t forget to save your profile otherwise it’s gone the next time you start PuTTY

Make your Server ssh’able from the internet
When you want to connect to your server other the internet when you are not at home the first step is to forward your port for SSH in your router to your server. Here is a pretty detailed guide that explains how to accomplish that.
The default port for SSH is 22 on the TCP protocol – but I recommend you to change it to some uncommon port since everyone would be able to connect to your server.
To change the port of your SSH server on Ubuntu you have the edit the file etc/ssh/sshd_config
$ sudo vi etc/ssh/sshd_config
In line 5 change the port to your desired one. Check the list of common TCP ports before you choose a port.
When you changed the port and saved the file restart your SSH server
$ sudo service ssh restart
To connect to the server use the -p parameter in Linux
$ ssh -p 2224 [email protected]
In PuTTY just edit the port field for you profile
Get a static address to connect to your server
Now you should be able to connect to your server over the internet – but when you don’t have a static IP address (you would know if you would have one) it could be some effort to always have your current external IP of your network with you. Here comes NoIP that gives you a free domain that will always forward to your current IP. So you can easily connect to your server with always the same address.
First go to noip.com and sign up. When you activated your account go to manage hosts in your administrator interface.

Now you should already see your address from the registration process.
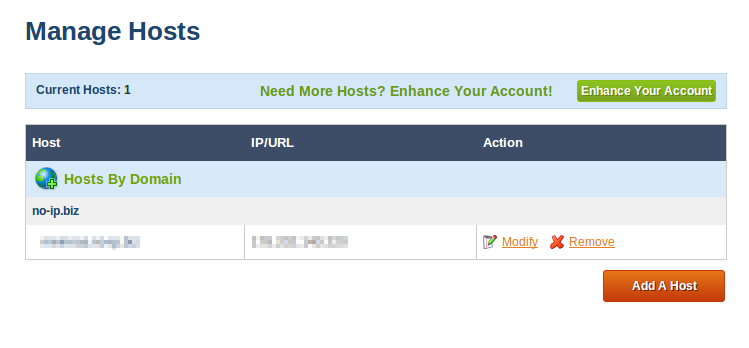
When you did not register an address while you signed up add a host. Just leave the default settings, choose a domain name and add the host. That’s it now you could connect to your server with your new created domain.
But the tell NoIP that our IP have changed we need to set it up either in our router nor on our NAS server. When you want to use your router to update NoIP please consider not every router will provide this feature – check the manual.
When you need to set up the NoIP client on your server you need to compile it on your own. To compile software under Linux install the build-essentials
$ sudo apt-get install build-essential checkinstall
Now we have our compiler yet we need the actual NoIP package. Move to /usr/local/src/ and download the package. You can use wget – a simple but powerful command-line downloader – to download it.
$ cd /usr/local/src/ $ sudo wget http://www.no-ip.com/client/linux/noip-duc-linux.tar.gz
The next step is to extract the downloaded package to your hard drive with tar. The xf parameters tells tar to read from an archive (f) and extract it to the hard drive (x)
$ sudo tar xf noip-duc-linux.tar.gz $ cd noip-2.1.9-1/
Finally we will build and install the package with make
$ sudo make install
First you need to enter your credentials from noip.com
Please enter the login/email string for no-ip.com [email protected] Please enter the password for user ‘[email protected]’ **********
In the last step of the installation you will be asked for an update interval and if you wish to start a process after a successful installation. You could run for example a script Pushover notification that will inform you when you have a new IP address. The values between the square brackets are default values – that means when you don’t enter anything and press enter theses values will be taken
Please enter an update interval:[30] 15 Do you wish to run something at successful update?[N] (y/N)
Now you are able to connect to your server. The next steps will be setting up your data drives, SMB, NFS network shares, a MySQL database, an FTP Server and much more. When you have anything that you want to read about feel free to request it in the comments. Check back for new posts coming soon.
| << Previous: Operating System | << Contents >> | Next: Software>> |
Nice tutorial @SchadLucas!
I’m running Debian Netinst on my nas. It’s a little lighter than Ubuntu Minimal, but you really can’t tell a diffrence.
Recommendations
– If you have a device that only supports dlna, minidlna works nice for that.
— Config file: /etc/minidlna.conf
— /etc/init.d/minidlna – Change “USER=minidlna” to “USER=YourUserName”
— service minidlna force-reload
– When installing software, add “–no-install-recommends” to the end, to keep excess packages from installing. (sudo apt-get install openssh-server –no-install-recommends)